⚠️ This content is archived as of March 2026 and is retained exclusively for reference. Find current offerings.
Lab 8: Making Your Own Website
Table of contents
In this lab we will take a brief detour away from Python and data science libraries to talk about websites and web development. By the end of this lab, you will have created your own public-facing website that you can show off to your friends and family and customize with more information about you, showcase school or personal projects, and more (if you want, of course).
This lab will probably take 2 hours to complete, so buckle in! Course staff are here to help with troubleshooting and any questions you might have.
Overview
Websites can take a variety of forms, and are created in a variety of ways. On the most basic level, a website consists of pages created in a markup language, like HTML (HyperText Markup Language). If you have ever used “Inspect” or “Inspect Element” on a website (Figure 1), you have probably seen HTML before. It consists of tags that start and end with angle brackets (e.g. <html>). Even though HTML doesn’t support more complicated code like if-statements or for loops (HTML technically isn’t even a programming language), when combined with other code it is capable of creating amazingly complex websites.
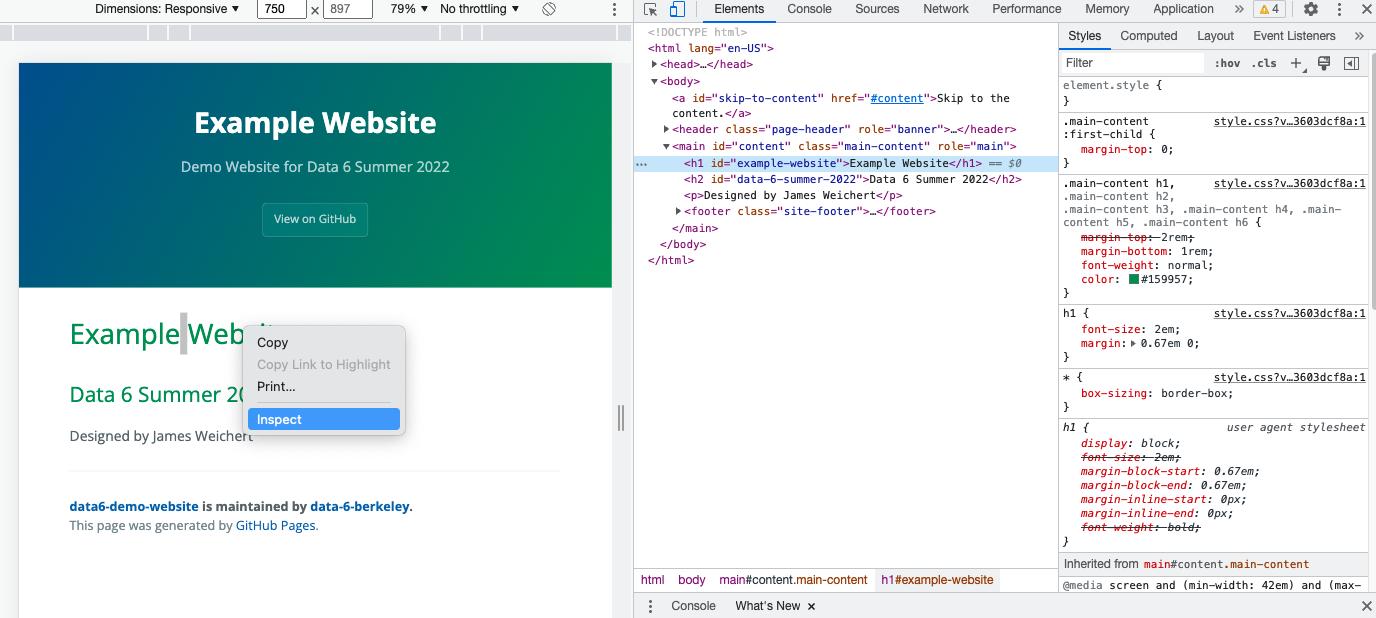 Figure 1 - Inspecting HTML on a Website
Website development also usually involves writing code in a variety of other languages, including CSS (for styling your website), JavaScript (for making your website more responsive), and PHP (for integrating your website with a database). However, to create a simple website you don’t need to know anything about these more complicated languages.
In fact, the website you will create today will simplify things a lot by taking care of many of the behind-the-scenes details, including formatting, styling, and hosting. You will also be able to create your website in markdown, the same language that is used to create markdown cells in Jupyter Notebooks. This way, you don’t even have to worry about understanding HTML (which is a big time-saver).
To make things as simple as possible, we will use GitHub Pages to build and host our website (on the world wide web!). GitHub Pages is great because it is free and integrates well with the GitHub version control system. Once you create your website, you will host it on GitHub Pages with your own GitHub account and will be able to edit it whenever you want. As an example of what’s possible with GitHub Pages, look no further than the Data 6 website — it was created using the same tools you’ll learn today.
Let’s get started!
Step 1 — Creating a GitHub Account
First you will have to set a GitHub account to allow you to develop and publish your website. GitHub is free and is also used in a lot of data science and computer science classes at Berkeley. If you already have a GitHub account (that you want to use for this lab), you can skip this step.
- Create a GitHub Account (go to the site and click “Sign Up” in the top right).
- Your username is up to you, but it may be a good idea to choose something professional since you might use this account in the future for something else. Your website URL will contain your username.
- After entering your credentials, it may ask you questions like “What kind of work do you do, mainly?”. You can skip these; scroll all the way to the bottom and continue.
- You’ll then need to verify your email address.
Step 2 — Creating a Blank Website
- Create a New Repository. It may prompt you to do this after verifying your email; if it doesn’t, you can go to GitHub and click the green “New” button.
 Figure 2 - Creating a New Repository
- A repository, or repo for short, is like a folder for a project.
- You will need to select a name for the repository. You can name the repository whatever you want, but we’d recommend something like
“data-6-website”,“[NAME]-website”or“portfolio” - Make sure to select Public and add a
READMEfile. Overall, your settings should look like this (but with a different username and repo name):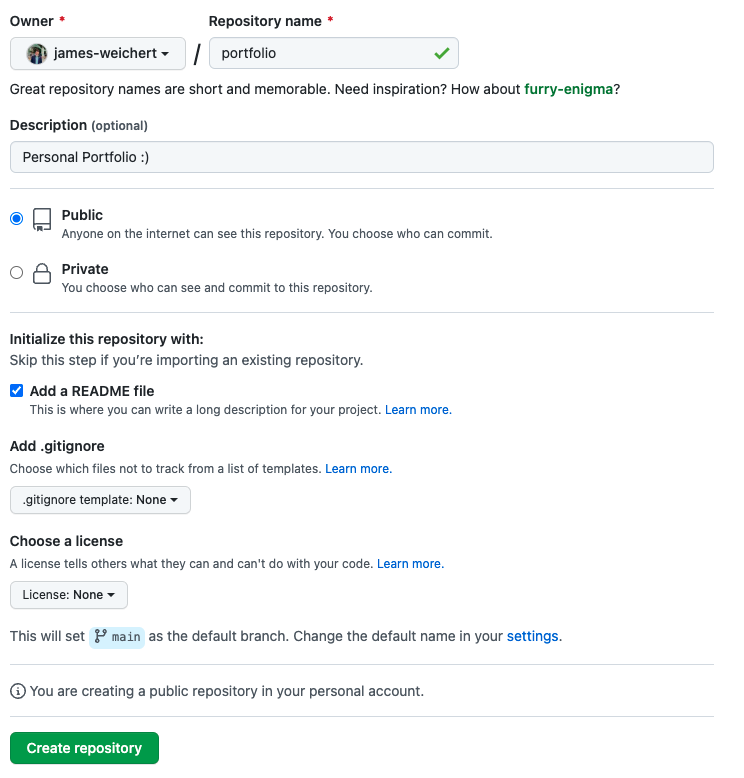 Figure 3 - Repository Settings
- Enable GitHub Pages for your Repo. GitHub Pages is the feature we will use to create our website. Follow these steps:
- From your repo’s main page, click the “Settings” tab in the top right corner.
- Click “Pages” in the menu on the left (it should be towards the bottom).
- Under “Branch”, change “None” to “main”. Click “Save”.
- Under “Theme Chooser”, click “Choose a theme”. It will allow you to choose one of several themes; pick the one you like the most and click “Select theme”. If you end up not liking your choice, you can always come back to this menu and change the theme, so don’t worry. Note: If you are brought to a page that has you try and edit your file (it may say something like “Edit new file”), just click “Cancel”.
- After you follow these steps, your site will be public. You will be shown its URL; it will be in the form
<your github username>.github.io/<your repo name>. Keep a tab open with your website while working on the rest of the assignment.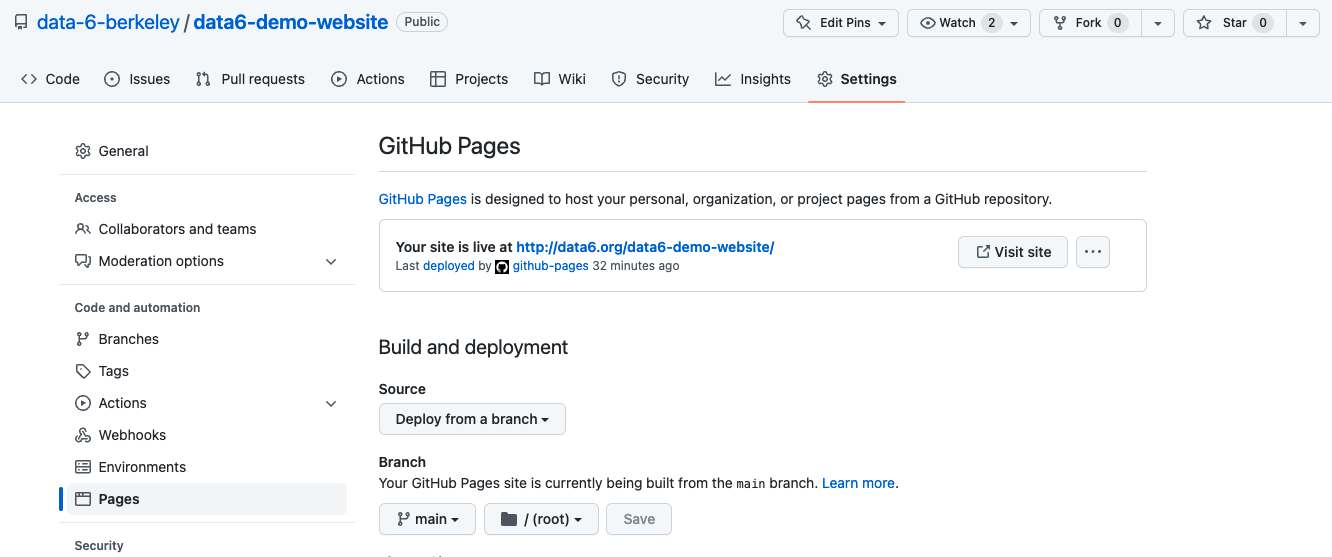 Figure 4 - Publishing via GitHub Pages
Step 3 — Adding Content
- Navigate back to the main page for your repo by clicking its name in the top-left of your screen. It should now look something like this, though the file
README.mdmight not have very much in it.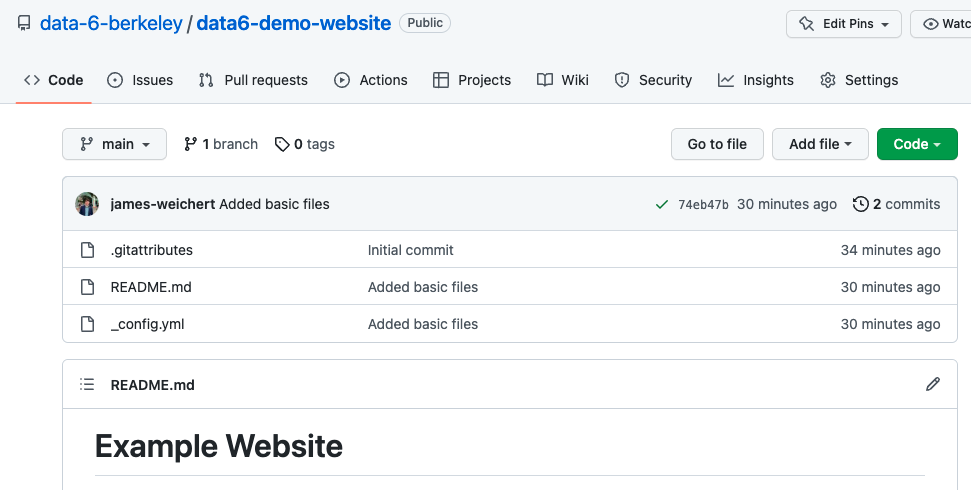 Figure 5 - Click the Pencil Icon to Edit
 README.md - The
README.mdfile is where you’ll put all of the content for your website (.mddenotes Markdown). To editREADME.md(both now and moving forward), you’ll need to click the pencil icon. (In the screenshot above, it’s across from the “README.md” text.)- You should be brought to an interface that allows you to edit
README.md. - Under the hood, GitHub Pages uses a library called Jekyll to convert your
README.mdto the standard HTML file format. - There’s another file in your repo, called
_config.yml– it tells GitHub Pages which theme you chose (amongst other information). You don’t need to edit this file. Changing the theme in settings will automatically change this file for you.
- You should be brought to an interface that allows you to edit
- You can now edit your
README.mdfile to include the contents you want it to. Exactly what you put on your page is up to you, but here are some suggestions: Add a heading at the top of the file using the#symbol to give your website a title- Add your name underneath the title
- Add a short bio or introduction about yourself, or talk about what you’ve learned and done in Data 6 so far
- Add more content types (like images or visualizations) (see Step 4 for more details)
- Once you’re satisfied with your website content, scroll down to the bottom of the page, and click “Commit changes”.
- You can think of committing as saving your changes.
- You can add a commit message if you’d like, saying something like “added text to website”. (This is generally good practice)
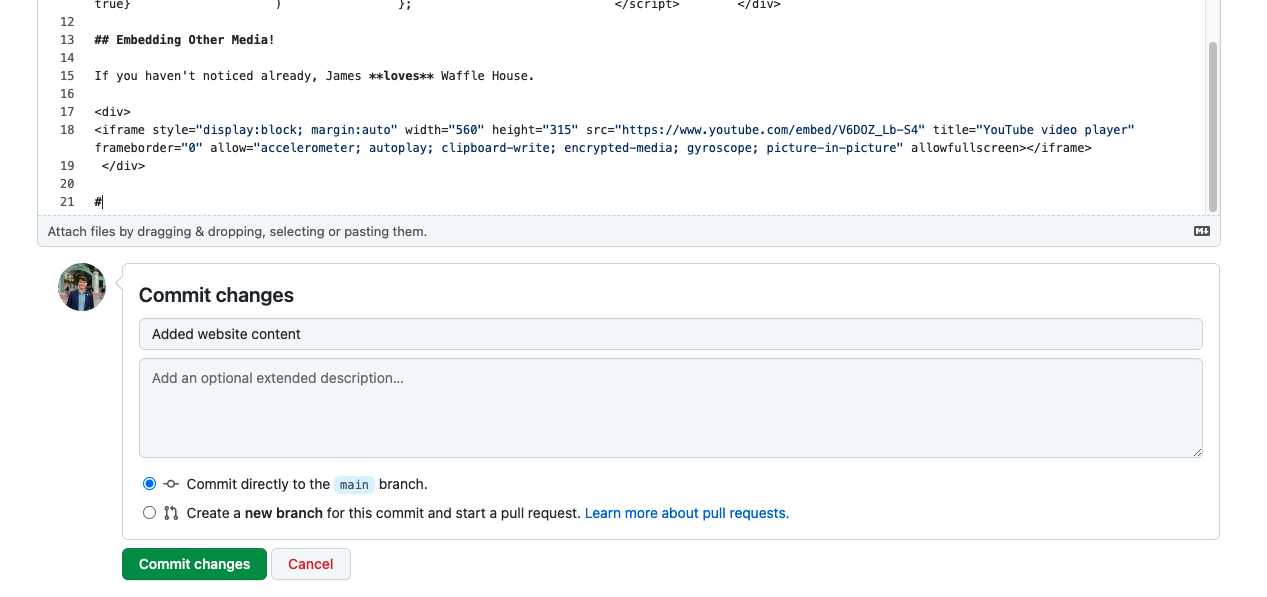 Figure 6 — Committing Your Changes
- After committing, open your website once again (or refresh the page). The changes will usually take 1-2 minutes to deploy to your website, so be patient!
Step 4 — Customizing Your Website
Now that you’ve added some content to your website, you can go a step further by styling and customizing elements of page. Here are a few additional things you can do to spice up your website:
- Use Markdown Formatting
- Check out the Mardkown Guide below for a refresher on markdown syntax and formatting, including how to bold text or add hyperlinks
- Change Your Theme
- If you want, you can switch to a different website theme by going to the “Settings” tab of your Repo, clicking on “Pages” and then clicking “Change theme”
- Add Images
- Adding images is a two-step process:
- First, navigate to your Repo’s main page, and click “Add file > Upload files”. Choose which images you want to upload and click “Commit changes”
- Edit your
README.mdfile and copy the code below into your file at the location where you want your image to appear, making sure to replaceIMAGE.PNGwith the full name (including file type extension) of the image(s) you uploaded. Feel free to adjust thewidthnumber to resize your image.<img src="./IMAGE.PNG" style="width:50%; margin:auto; display:block">
- Add a Data Visualization
- Part of the reason why Data 6 uses the Plotly visualization library is because it allows you to embed interactive visualizations on websites! If you want, you can embed any of the Plotly (usually starts with
px.) visualizations we’ve created in the class (or feel free to make your own!). To embed a Plotly visualization in your website, follow these steps:
- Open up the Jupyter Notebook with the graph/map you want to export (Lecture 20 demos are recommended) and find the code that generated the visualization.
- Assign that code to a name like
fig. This will prevent the visualization from showing up in the notebook (unless you add the linefig.show()below it), but that’s ok. - In a new cell, run the following two lines.
figis a placeholder for the name of your visualization, so if you used a different variable name, changefigtoo:import plotly print(plotly.offline.plot(fig, include_plotlyjs=False, output_type='div')) - Copy the output of that code (it should start with
<div>and end with</div>, and will be pretty long and ugly). - Go back to GitHub and edit
README.md. At the place in your website where you want to add your visualization, paste that code into yourREADME.mdfile. Do this separately for each visualization you want to put on your website. - Before the code for your first visualization, put the following code on its own on a line:
<script src="https://cdn.plot.ly/plotly-latest.min.js"></script> - Make sure to commit your changes after (a good commit message here would be “added visualization”). At this point, your
README.mdmight look something like this: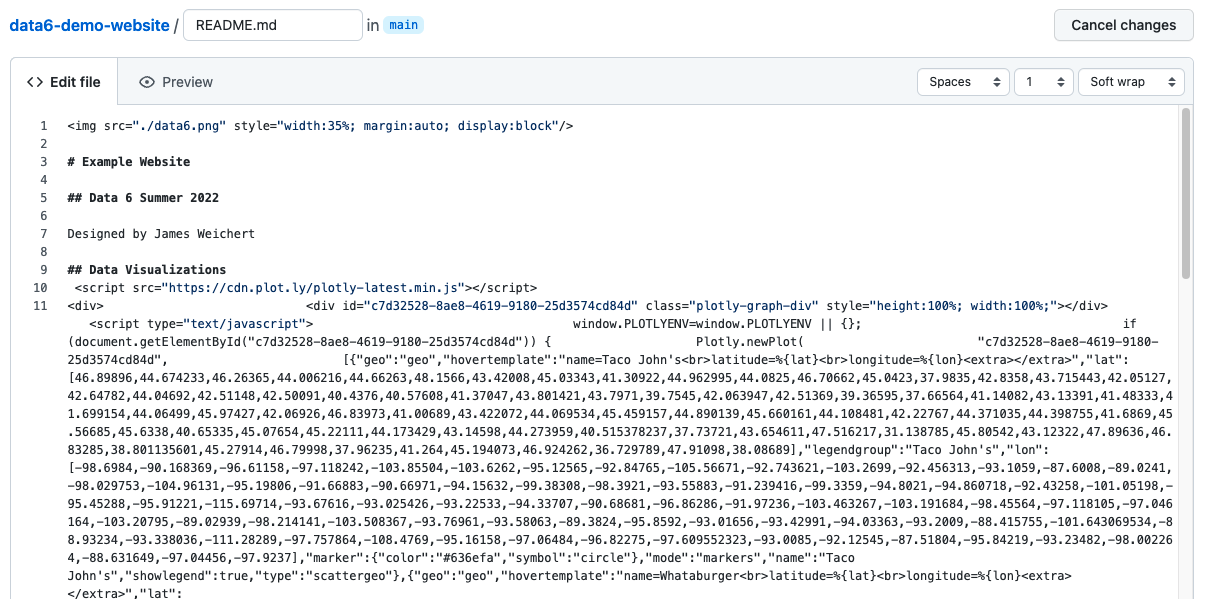 Figure 7 — Adding Visualization Code
- Part of the reason why Data 6 uses the Plotly visualization library is because it allows you to embed interactive visualizations on websites! If you want, you can embed any of the Plotly (usually starts with
- Embed a Tweet, YouTube Video, Song, etc.
- A lot of social media platforms allow you to embed content from their website into your own website. This embedding usually happens with an
<iframe>. - Tweets. On the Twitter website, click the three dots at the top right of any tweet, then click “Embed Tweet”. A new site will appear; click “Copy Code” to copy the necessary code, and paste that code somewhere in your
README.md(but not in the middle of the long visualization code). - YouTube Videos. On the page of a YouTube video, click “Share”, then click “Embed”. Copy the code that appears and paste it somewhere in your
README.md. You’ll notice that the code has numbers for “width” and “height”; feel free to change these. - Songs. Follow these instructions for Spotify and these instructions for Apple Music. Other sites will have similar instructions.
- Instagram Posts. On the Instagram website, click the three dots at the top right of any post, then click “Embed” and then “Copy Embed Code”. Copy the code that appears and paste it somewhere in your README.md (beware, the code may be a little long).
- A lot of social media platforms allow you to embed content from their website into your own website. This embedding usually happens with an
And voila! You just made your own website! Congratulations on finishing Lab 8. Feel free to continue to customize your website if you want. It’s all up to you!
Markdown Guide
Here is are a few markdown syntax features that may be helpful while creating your website:
| Syntax | Usage | Example |
# | Header (Adding multiple # in succession decreases the size of the header) | ## This is a Level 2 Header |
**TEXT** | Bold Text | **This text will be bolded |
*TEXT* | Italic Text | *This text will be italicized |
[TEXT](LINK) | Hyperlink (the TEXT will be displayed, and clicking on it will redirect to the website at LINK) | [Data 6 Website](https://data6.org/su22/) |
<br> | Blank Line (adds an empty line) | <br> |
<hr> | Adds a horizontal line through your page (<hr> stands for ‘horizontal rule’) | <hr> |
The Summer 2022 version of the website development lab was adapted by James Weichert from the Data 94 Spring 2021 Homework 9, created by Suraj Rampure.